Okay - so we are at 34.5 weeks with Baby V which means 2.5 weeks till "full term" at 37 weeks and 5.5 weeks until baby due date. I am getting a little anxious and want to do things - but baby had decided its favorite place in my big ol' belly is right in my ribs. So whenever I try to sit - ouch. A foot right in my rib cage. I can usually give baby a little nudge, but baby wants what baby wants. And apparently baby wants to sit in my ribs so I guess I will just have to deal for a few more weeks! Which brings me to doing a lot of baby DIY searches on google and trying to find some nice little "nesting" projects to keep myself busy while Andrew finished up painting our amazing shelves for the nursery (his DIY baby project.) So my first project was closet dividers to show me where I need to place all of the adorable baby clothes.
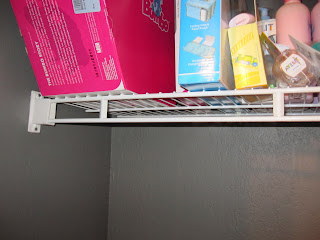
A necessity? No. But pretty darn cute? Absolutely. So I started googling away one afternoon and came across some adorable ones from Babies R Us. So I thought to myself - let's add these to our registry. As I was about to click "Add to Baby Registry" I realize that they would not fit in our closet. See we have some irregulary closet shelves and not a regular pole as you can see in the picture.
And here comes my first DIY project - Baby Clothes Dividers. With the help of my lovely husband's wood working skills, he was able to create some square wooden dividers that I can paint/decorate to match our nursery.
I will admit - I wasn't exactly sure they would work but I went with it. I trusted Andrew (I mean he did go to school to design things) so I started my project of making them match the nursery.
My first step was to paint the outsides and corners. I planned on using modge podge and had used before so I knew corners are hard to make look nice. I decided to just avoid it all and painted it yellow and put the paper just on the faces of the wood. This also allowed me to bring a little more yellow into the dividers.
Next I decided to use some fun paper I had gotten at Hobby Lobby and Michaels that had some black and white modern designs. I chose a different paper for each divider. Then I labeled them with which size clothing by using yellow paper and cute stickers. (My biggest complaint with stickers is you have to buy the whole alphabet to get cool number stickers! The pages of number stickers were just not that great.) So I cut out the paper to fit the face of the wood. I knew I didn't need to have it fit perfectly since it would have a yellow painted outline around the sides and corners. I did this for both sides. Once I did a few coats of modge podge, I put my yellow label with my cute stickers on and modge podged another coat. After letting it all dry - I had my finished project!
So I do have one extra square divider left and I think I will make an extra for clothes in the toddler stage. I know I won't get many right now, but you just want to be prepared. And I know once baby arrives making additional dividers for larger clothes will be at the far bottom of my list. So I might as well do it now when I have the time. Here is a pic of the lovely dividers in our closet.
Notice there are not a lot of clothes. For those of you (like myself) who know you would go crazy on baby clothes if you knew the sex of the baby - Do Not Find Out the Sex. That is what we did and there are very limited amounts of 'gender neutral' clothing. This really puts a minimum on being able to buy clothes prior to the arrival. Now once baby arrives and we know if we need blue or pink - it might get a little crazy!
10 & 11 Months
9 years ago


0 comments:
Post a Comment